- If you work with the standalone edition (with file in BMP, JPEG, PNG or TIFF format):
- The dialog box Select File To Open appears if you double-click on the empty workspace of the program or if you click on the button
 on the Control Panel. You can also drag the required image into the workspace of the program.
- If you work with the plugin:
- Open an image in your photo editor by calling the command File -> Open or using the key combination Ctrl+O on Windows, ⌘+O on Macintosh.
If the image in Grayscale mode, switch it to RGB. For example, in Adobe Photoshop use command: Image -> Mode -> RGB.
Call the AKVIS Coloriage plug-in:
In Adobe Photoshop select the menu item Filter –> AKVIS –> Coloriage; in Corel Paint Shop Pro select Effects –> Plugins -> AKVIS –> Coloriage; in Corel Photo-Paint select Effects –> AKVIS –> Coloriage.
Hint: A selection made in the graphics editor will be transferred to the plug-in and displayed as the outline made with the Keep Color Pencil
 .
.

AKVIS Coloriage offers several ways to select colors: in the Color Library, in the palettes: Color, Swatches, Multicolor, in the Select Color standard dialog or from the image itself with the Eyedropper tool ![]() .
.
-
Change the brush size of the Pencil tool.
Hint (for all tools): You can open the tool's options dialog by clicking on that tool's icon or by right-clicking anywhere in the image window.
-
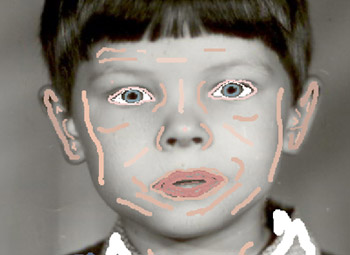
Draw an outline within the object following the shape of it's boundaries. If the object has several colors, you should draw a line along the boundary of the object that should be painted into the selected color.

- If the object is rather large or there are sharp visible boundaries within it (lighter and darker areas, for example), draw several strokes inside the object.
-
If there are details inside the object that will be painted in other colors, outline them with the main color of the object. For example, you should outline lips, eyes, buttons on a coat, etc.

Hint: If you want a smooth transition of color, draw the strokes farther apart from each other (the farther the strokes are apart, the smoother the transition). If the transition needs to be sharper, draw the color strokes closer together. This is why it is necessary, for example, to draw around the eyes and mouth with the color chosen for the skin.
Selective colorization
If you want to change the color of a particular object on a color photo while keeping other areas unchanged, use the Pencil tool ![]() to set the color for the object and then draw a closed outline around this object using the Keep Color Pencil
to set the color for the object and then draw a closed outline around this object using the Keep Color Pencil ![]() .
.
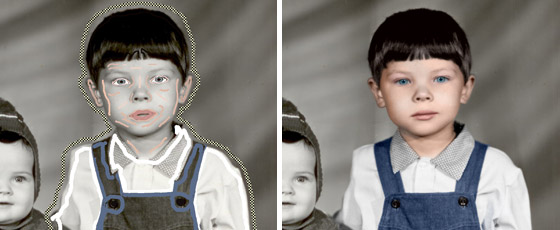 |
| "Keep Color Pencil" used |
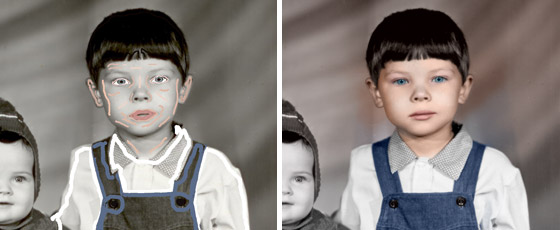 |
| "Keep Color Pencil" not used |
Multicolor mode
It's possible to draw several colors at once with the Pencil tool ![]() using the Multicolor mode. It's helpful for complex patterns and objects with clear boundaries. This mode appreciably saves you time.
using the Multicolor mode. It's helpful for complex patterns and objects with clear boundaries. This mode appreciably saves you time.
Note: This mode is only available for advanced licenses of AKVIS Coloriage (Home Deluxe and Business).
Activate Multicolor mode in the options of the Pencil tool.

Upon doing so, the Settings Panel will automatically switch to the Multicolor palette.
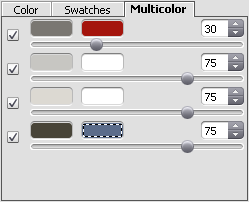
In Multicolor mode a stroke changes its color according to the initial color field over which it passes.
The colors used are set by adding them to color plates. The left plate shows the color that will be replaced, the right plate shows the new color. The colors in the color plates can be set in the following ways:
- from the image with the Eyedropper tool (click on the color plate and then on the desired point in the image);
- from the Color Library which contains colors that are difficult to pick out: the color of skin, hair, lips, grass, trees, stones, etc;
- from the Select Color dialog, which is activated by double-clicking the left mouse button on the color plate.
Adjust the Sensitivity for each pair of colors. At higher values of this parameter, more shades of the source color are taken into account when drawing strokes.
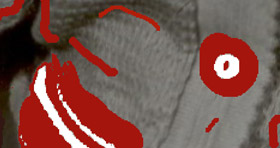 |
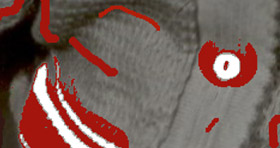 |
| The Sensitivity of the color pairs: dark-gray — red = 75 light-gray — white = 75 |
The Sensitivity of the color pairs: dark-gray — red = 30 light-gray — white = 90 |
Fast color changing
If you want to change the color of the drawn stroke you do not need to re-draw the lines. Just activate the Tube tool ![]() and left-click on the stroke.
and left-click on the stroke.
If you want to change the color of several strokes having one color (for example, from red to blue), activate the Magic Tube tool ![]() and left-click on one of these strokes.
and left-click on one of these strokes.
 |
 |
| Changing the strokes from red to blue |
Note: The resulting color of the colorized object depends on the brightness of the original color. For example, if you apply a dark color to a bright area, the resulting color will be bright, as the program will adjust the new color to the brightness of the original image.
If you are not satisfied with the result you can make the final color lighter or darker. Change the brightness range of the selected color using the gradient line above the Color palette.
Attention! The brightness range compression can result in deterioration of the detail and deepness of an image. Change the brightness range carefully.
To change the brightness range for a drawn stroke you should select the required brightness range, take the Tube tool ![]() and left-click on this stroke. If you want to recolor strokes having one and the same color and brightness, select the Magic Tube tool
and left-click on this stroke. If you want to recolor strokes having one and the same color and brightness, select the Magic Tube tool ![]() and left-click on one of the strokes. To recolor all strokes having the same color regardless of the brightness range, use this tool with the Ctrl-key pressed on the keyboard (⌘ on Macintosh).
and left-click on one of the strokes. To recolor all strokes having the same color regardless of the brightness range, use this tool with the Ctrl-key pressed on the keyboard (⌘ on Macintosh).
In the Normal Preview mode ![]() all strokes are displayed in the chosen color, regardless of the selected brightness, i.e. various tones of the same color will look the same. When the Brightness Preview
all strokes are displayed in the chosen color, regardless of the selected brightness, i.e. various tones of the same color will look the same. When the Brightness Preview ![]() is activated, you can see how the strokes will look on the resulting image.
is activated, you can see how the strokes will look on the resulting image.
 |
 |
| Normal Preview | Brightness Preview |

You can use the Eraser tool ![]() to erase the drawn strokes.
to erase the drawn strokes.
To remove a stroke, press the Alt-key on Windows, Option-key on Mac, and left-click with the Eraser tool on the stroke.
If you want to remove all strokes, press the keys Alt+Ctrl on Win, Option+⌘ on Mac, and click on the picture.
You can change the size of the Eraser tool in the pop up window which appears when clicking on the tool's icon and/or right clicking on any place on the image.
If you want to cancel the last action made with the tools, press the key combination Ctrl+Z on Win, ⌘+Z on Mac. You can cancel the last operation with the button Undo ![]() and restore the changes with the button Redo
and restore the changes with the button Redo ![]() .
.

To remove a picture from the list, click on
Note: This feature is only available for the Home Deluxe and Business licenses.

Variations of Colorization
Hints:
Loading a new image into the program removes all pictures in this section. Save your favorite results under new names.
You can hide Variations in the program preferences ![]() .
.
Attention! Use this brush at the final step!
If you re-run processing ![]() or switch between the images in Variations, the changes made with the tool will be lost.
or switch between the images in Variations, the changes made with the tool will be lost.
Choose the color and adjust the options for the brush.
Click on ![]() to see the tool's options in a floating window. This window will also appear if you right click anywhere on the image. To adjust a parameter, enter a new value into the corresponding field or move the slider.
to see the tool's options in a floating window. This window will also appear if you right click anywhere on the image. To adjust a parameter, enter a new value into the corresponding field or move the slider.
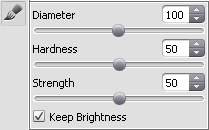
- Diameter (1-200). The stroke width of the brush (in pixels).
- Hardness (0-100). The hardness of the outer edge of the brush. The higher the value of the parameter, the harder the brush edge is. At the value = 100% the brush is as hard as a pencil; at a low value of the parameter the brush strokes are soft.
- Strength (0-100). The intensity of the strokes. The higher the value of the parameter, the more intense the colors of the applied strokes are.
- Keep Brightness check-box. When the check-box is enabled, the brightness of the drawn stroke is changed to comply with the background and with the overall brightness of the image (the strokes get lighter on the light zones of the image and darker on the dark zones). When the check-box is disabled, the brightness of the strokes does not depend on the brightness of the image.
Edit the strokes using the Eraser tool ![]() . The tool's options are the same as for the brush except the Keep Brightness check-box.
. The tool's options are the same as for the brush except the Keep Brightness check-box.
Later you can load the strokes with
In case of some unexpected event (such as a power loss, etc.) the program autosaves the strokes into the coloriage-autosave.strokes file each time when you run processing ![]() .
.
In the standalone version, you can also print your result using ![]() .
.
- If you work with the standalone edition:
- Click on the button
 to open the Save As dialog box. Enter a name for the file, choose the format (TIFF, BMP, JPEG or PNG) and indicate the target folder.
- If you work with the plugin:
- Press the button
 to apply the colorization result to your picture and close the plugin window. The AKVIS Coloriage plugin will close and the colored image will appear in the workspace of the photo editor.
Call the Save As dialog box using the command File -> Save As, enter a name for the file, choose the format and indicate the target folder.
 |
| Click the image to open its larger copy in a new window |