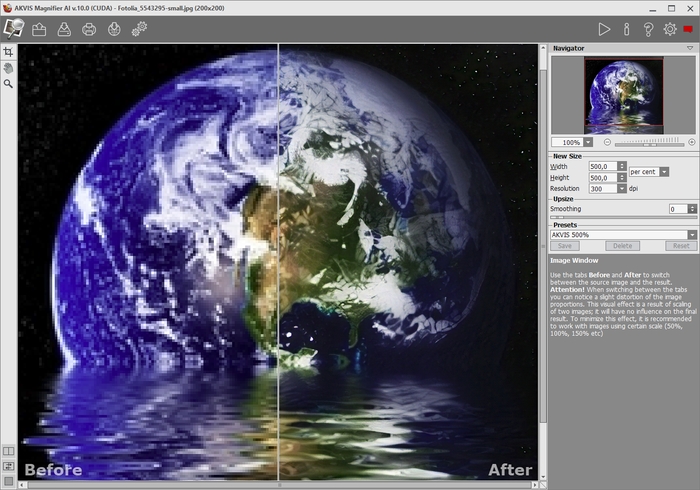
Workspace of AKVIS Magnifier AI
AKVIS Magnifier AI can work independently as a standalone program as well as a plug-in to Adobe Photoshop and Photoshop Elements. The plug-in version supports the "automate" function.
To launch AKVIS Magnifier AI, do the following:
To launch the standalone version, run the program directly:
On a Mac computer - launch the app from the Application folder.
Note: Unlike other AKVIS plugins (which are available in Filter menu), you will find AKVIS Magnifier AI plugin in Automate menu of Photoshop.
To call AKVIS Magnifier AI plugin in Adobe Photoshop select the menu item File -> Automate -> AKVIS Magnifier AI; in Adobe Photoshop Elements use the command: File -> Automation Tools -> AKVIS Magnifier AI.
Attention! It is imperative that the layers must be merged before calling the plugin.
The AKVIS Magnifier AI workspace looks like this:

Parts of the program's window:
The left part of AKVIS Magnifier AI’s workspace is taken by the Image Window with two tabs Before and After. The Before tab displays the original image, the After tab shows the result. You can compare the original and the resulting images by just left-clicking on any point of the image.
You can select how Image Window and Before/After tabs will be shown by adjusting the View Modes in the bottom part of the left panel.
Attention! When switching between the tabs you can notice a slight distortion of the image proportions. This visual effect is a result of simultaneous scaling of two images; it will have no influence on the final result. To minimize this effect, it is recommended to work with images using certain scales (50%, 100%, 150% etc).
In the upper part of the program's window you can see the Control Panel with the following buttons:
Тo the left of the Image Window there is the Toolbar with these tools:
Double-clicking on the tool's icon ![]() on the Toolbar makes the image fit the Image Window.
on the Toolbar makes the image fit the Image Window.
Double-clicking on the tool's icon ![]() on the Toolbar makes the image scale to 100% (actual size).
on the Toolbar makes the image scale to 100% (actual size).
And below, there are three buttons which control how the Image Window looks like.
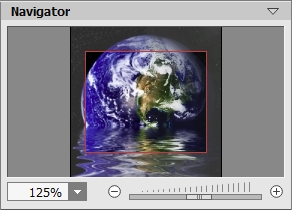
Navigate and scale the image using the Navigator. In the Navigator you can see the reduced copy of the image. The red frame shows the part of the image that is now visible in the Image Window; the areas outside the frame will be shaded. Drag the frame to make other parts of the image visible. To move the frame, bring the cursor inside the frame, press the left mouse button and, keeping it pressed, move the frame in the Navigator.

Additionally, you can move the image in the Image Window with the scroll bars or by holding down the space bar, then holding down the left mouse button while moving the mouse. The mouse's scroll wheel can move the image up and down, and holding Ctrl on Windows, ⌘ on Mac – while using the scroll wheel will move the image left and right. Holding Alt on Windows, Option on Mac will scale the image. Right-click on the scroll bar to activate the quick navigation menu.
Use the slider or the buttons ![]() and
and ![]() , to scale the image in the Image Window. When you click on the
, to scale the image in the Image Window. When you click on the ![]() button or move the slider to the right, the image scale increases. When you click on the
button or move the slider to the right, the image scale increases. When you click on the ![]() button or move the slider to the left, the image scale reduces.
button or move the slider to the left, the image scale reduces.
You can also change the image scale by entering a new coefficient into the scale field. The fall-down menu shows some frequently used coefficients.
You can use hot-keys to change the image scale + and Ctrl++ (⌘++ in Mac) to increase the image scale and - and Ctrl+- (⌘+- in Mac) to reduce the scale.
Under the Navigator there is a Settings Panel with parameters of advanced image processing.
In the Presets field you can save the current settings as a preset to use them in the future. When you launch the program, it uses the settings of the last used preset.
Under the Settings Panel you can see Hints for the parameters and buttons when you hover over them with the cursor. You can choose where the hints will be shown or hide them in the program's Preferences.