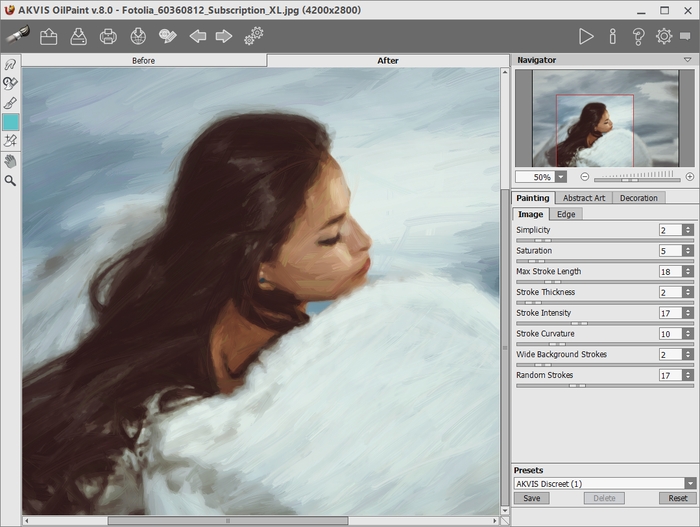
Workspace of AKVIS OilPaint
AKVIS OilPaint can work independently as a standalone program as well as a plugin to a photo editor.
To launch the standalone version, run the program directly:
On a Windows computer - select it from the Start menu or use the program's shortcut.
On a Mac computer - launch the app from the Application folder.
To call the plugin, select it from filters of your image editing program.
The program's workspace looks like this:

The left part of the AKVIS OilPaint window is taken by the Image Window with two tabs: Before and After. Under the Before tab you can see the original photo. The After tab shows the resulting image. You can switch between the windows by left-clicking on the tab with mouse button. To compare the original and the resulting images, click on the image and hold the button pressed - the program will currently switch between tabs.
In the upper part of the program's window you can see the Control Panel.
Right mouse click on this button displays the list of recent images. You can change their number in the program's preferences.
Left mouse click shows the list of the commands:
![]() (available only in the standalone version) - It opens an image.
(available only in the standalone version) - It opens an image.
The hot-keys are Ctrl+O on Windows, ⌘+O on Mac.
![]() - It loads a list of presets (.oilpaint file).
- It loads a list of presets (.oilpaint file).
![]() - It loads saved guiding lines (.direction file).
- It loads saved guiding lines (.direction file).
![]() (available only in the standalone version) - It saves the image in the chosen format.
(available only in the standalone version) - It saves the image in the chosen format.
The hot-keys are Ctrl+S on Windows, ⌘+S on Mac.
![]() - It saves user presets to a file with the .oilpaint extension.
- It saves user presets to a file with the .oilpaint extension.
![]() - It saves the guiding lines to a .direction file.
- It saves the guiding lines to a .direction file.
To the left of the Image Window there is the Toolbar. Different tools appear on the Before/After tabs.
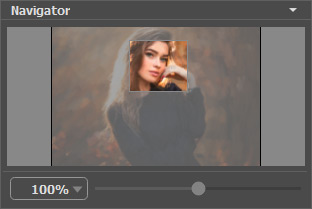
Navigate and scale the image using the Navigator. The frame in the Navigator surrounds the area of the image which is visible in the Image Window; the area outside of the frame will be shaded. The frame can be dragged, thereby changing the visible portion of the image. To move the frame, place the cursor within it, left click the mouse, and then drag.

To scroll the image in the Image Window you can press the spacebar on the keyboard and drag the image with the left mouse button. Use the scroll wheel of the mouse to move the image up/down, by keeping the Ctrl key pressed – to the left/to the right, by keeping the Alt key pressed − scale the image. Right-click on the scroll bar to activate the quick navigation menu.
Use the slider or the buttons ![]() and
and ![]() , to scale the image in the Image Window. When you click on the
, to scale the image in the Image Window. When you click on the ![]() button or move the slider to the right, the image scale increases. When you click on the
button or move the slider to the right, the image scale increases. When you click on the ![]() button or move the slider to the left, the image scale reduces.
button or move the slider to the left, the image scale reduces.
You can also change the image scale by entering a new coefficient into the scale field. The fall-down menu shows some frequently used coefficients.
You can use hot-keys to change the image scale + and Ctrl++ (⌘++ in Mac) to increase the image scale and - and Ctrl+- (⌘+- in Mac) to reduce the scale.
Under the Navigator there is the Settings Panel with the Painting, Abstract Art, and Decoration tabs:
Below, in the Presets field you can save the current settings as a preset to use them in the future. The current settings can be saved, edited, deleted. When you launch the program, it uses the settings of the last used preset.
Under the Settings Panel you can see Hints for the parameters and buttons when you hover over them with the cursor. You can choose where the hints will be shown or hide them in the program's Preferences.